Inspiring Living Lifestyle

Enjoy these wonderful recipes from our travels, our family’s and our favorite cookbooks.


Candelaria Design Pasta Making Class

Join us for our first Candelaria Design Cooking Class as we make homemade pasta from scratch in our new Candelaria Design Demonstration Kitchen! Our Pasta Recipe is the very first recipe listed on this Recipe page, or you can click right here!

Enjoy and post your pasta making pictures on our Instagram Page @candelariadesign.

Click on the YouTube video below to view the class!

142986013.jpg

Mark's Authentic Italian Pasta Recipe

Once you have treated yourself to a Candelaria Design pasta maker, you’ll be ready to roll up your sleeves and start making homemade pasta with Mark’s easy but very flavorful recipe!

pasta eggs.jpeg

Our pasta machine is beautiful and practical as the attachments for fettuccine and spaghetti are permanently attached to the main pasta roller. Click HERE to purchase our custom Candelaria Design Pasta Maker.

The recipe could not be easier:

Making the pasta:

4-1/2 cups flour
6 eggs

The ingredients are simple: flour and eggs. The quantity of flour to eggs will be adjusted as you go so you must mix the pasta by hand. The idea is to create a dough that doesn’t stick to your hands or the board you’re working on. If it’s too dry you add another egg; if it’s too wet you add more flour. Always dust your pasta board and your hands with flour so the dough does not stick to your hands or the board. You will use this technique all the way through the process.

 Fill a large pot at least 5 inches deep with water. Cover and put on the stove to boil; add one heaping tablespoon of coarse salt.

To make the pasta, start out with 4-1/2 cups of flour and six eggs. On a large, flat board pour out the flour and shape into a mound. Make a valley in the middle of the mound – create a volcano! Break the eggs into the volcano and beat them with a fork. With a fork, begin to cover the eggs with flour, and continue little by little mixing in just enough flour so that the dough eventually sticks together uniformly. Flour your hands and knead for eight minutes until it is shiny and elastic. To test its readiness, stick your finger into the middle of the dough. If it comes out clean, the dough is ready for the pasta machine. If the dough is still sticky, knead in a little more flour.


Important: let the dough rest for at least 10 – 20 minutes. It can also be wrapped well and refrigerated at this point to be rolled out the next day

pasta dough.jpeg

I then cut the dough ball into quarters or slices which then are easy to roll. Start with the dial on 1 and keep rolling the dough through adjusting the setting higher and higher until you get to the pasta thinness that feels right for whatever you are making.

Once your sheets are made to your desired thinness then you can either move forward making ravioli or run the sheets through the fettuccine cutter or the spaghetti cutter. Flour the cutters before you use them so the dough does not stick. Do not let the pasta sheets dry before you use the fettuccine or spaghetti cutters. Once your fettuccine or spaghetti is cut you can swirl them in mounds on a lightly floured tray.


fetticine.jpeg

Once made you can drop the pasta into the boiling water and the fresh pasta will cook quickly – about 3-4 minutes and it will be done. Don’t overcook – you want the pasta to be firm but cooked – al dente. Drizzle with olive oil and or butter and grate some parmiggiano-reggiano cheese and you have the basics….. from there you can endlessly explore. Trust me you will be in pasta heaven!!!!

You call also follow us STEP-BY-STEP on our Candelaria Design YouTube Channel


Asparagus and Fontina Quiche

Here is another Springtime perfect breakfast, brunch, lunch or dinner recipe! This makes a wonderful addition to the Easter buffet as well. If you cannot find fontina cheese you can use all gruyere and it is just fine!

this gorgeous quiche was made with farm fresh eggs gifted by one of our clients!

this gorgeous quiche was made with farm fresh eggs gifted by one of our clients!

LET’S COOK!

You can either shave the asparagus or chop the spears whichever you prefer!

1 pound asparagus, ends trimmed

6 large eggs

1 cup heavy cream

1 tsp garlic salt

1 tsp freshly ground black pepper

8 ounces fontina cheese, grated (2 cups)

2 ounces gruyere cheese, grated ( 1/2 cup)

1 unbaked 9” pie crust (store bought is perfect)

IMG_4171.jpg

*Preheat oven to 350 degrees

*Using a vegetable peeler, slice the asparagus lengthwise into long, thin strips, starting just under the tip of each stalk. Leave the tips whole. (Alternatively, cut the asparagus into 1-inch pieces.)

*In a pot with a steamer insert or in a covered sauté pan fitted with an expandable steamer basket, bring 2 inches of water to a boil. Add the asparagus to the steamer insert or basket, cover, and steam until tender, about 30 seconds for strips and about 3 minutes for pieces.

*Rinse the asparagus under cold water to stop the cooking. Drain well and set aside.

*In a large bowl, whisk together the eggs, cream, garlic salt, and pepper. Stir in the Fontina, Gruyère, and reserved asparagus.

*Pour the mixture into the unbaked pie shell.

*Bake until lightly golden and set in the center when the pan is gently pushed, 40 to 45 minutes. If the crust is browning too quickly, cover it with foil to prevent it from burning.

*Remove from the oven and let stand for 5 to 10 minutes before serving. Cut into 6 or 8 slices and serve warm or at room temperature.

(we have made this recipe numerous times, the texture is wonderfully creamy and rich. This is taken from “Magnolia Table” by Joanna Gaines….a great cookbook all around! Find it HERE


Herbed Ricotta, Asparagus, and Phyllo Tart

IMG_3582 2.jpg

This recipe is so user friendly and versatile! It’s perfect for a Sunday brunch side dish or as a fresh veggie appetizer complimented by a crisp glass of rose. The crust is simply sheets of phyllo dough layered on top of one another, no fancy crimping needed. Hint: be sure the dough is thawed overnight in the refrigerator which banishes the issue of the dough sticking together. Use thinner asparagus spears as well so the cooking time is kept to a minimum and in line with the time it takes to cook the dough.


Ingredients:

3/4 cup part-skim ricotta cheese

1/4 cup chopped fresh flat-leaf parsley

1 1/2 teaspoons 1% low fat milk

1 TBLS fresh thyme leaves

1 garlic clove, grated

1/2 teaspoon kosher salt, divided

12 frozen phyllo pastry sheets, thawed (14” x 9”)

3 1/2 TBLS olive oil, divided

1 1/2 pounds medium asparagus spears, trimmed to length of 6 1/2”

1 ounce Parmigiano-Reggiano cheese, shaved (about 1/4 cup)

IMG_3582 2 2.jpg

Let’s Cook!

Preheat over to 400F

Stir together ricotta, parsley, milk, thyme, garlic and 3/8 tsp salt

Place 1 phyllo sheet on a baking sheet lined with parchment paper. (cover remaining dough to keep it from drying out). Lightly brush phyllo sheet with oil, and top with another phyllo sheet. Repeat layers with remaining phyllo sheets and oil, reserving 1 teaspoon oil to brush on asparagus.

Spread ricotta mixture on phyllo stack, leaving a 1/2 inch border. Arrange asparagus spears side by side over ricotta mixture. Brush asparagus with remaining 1 teaspoon oil. Bake at 400F until phyllo is browned and crisp, 22 to 25 minutes. Sprinkle with remaining 1/8 tsp salt (top with shaved cheese if desired).


Springtime Sweet Pea Dip

Well Spring has certainly sprung and this fresh and healthy dip is just perfect served with fresh farmer’s market vegetables and a crisp glass of wine! It couldn’t be easier to whip up and it is always a pleaser!

IMG_3574.jpg

Ingredients as follows (makes 2 cups)

1 1/2 cups sweet peas

3/4 cup ricotta cheese

1/4 cup shredded Parmesan cheese

3 TBLS chopped green onion

1 TBLS fresh mint leaves

1 TBLS olive oil

1/2 TSP kosher salt

1/2 TSP ground black pepper

GARNISH: shredded Parmesan cheese and fresh mint leaves

In the work bowl of a food processor, place peas, ricotta, Parmesan, green onion, mint, oil, salt, and pepper.

Pulse until smooth. Garnish with Parmesan and mint.

IMG_3573.jpg

Serve with beautiful and flavorful carrots, water crackers and sliced bell peppers! Add a sprinkling of Parmesan and wait for the swooning!


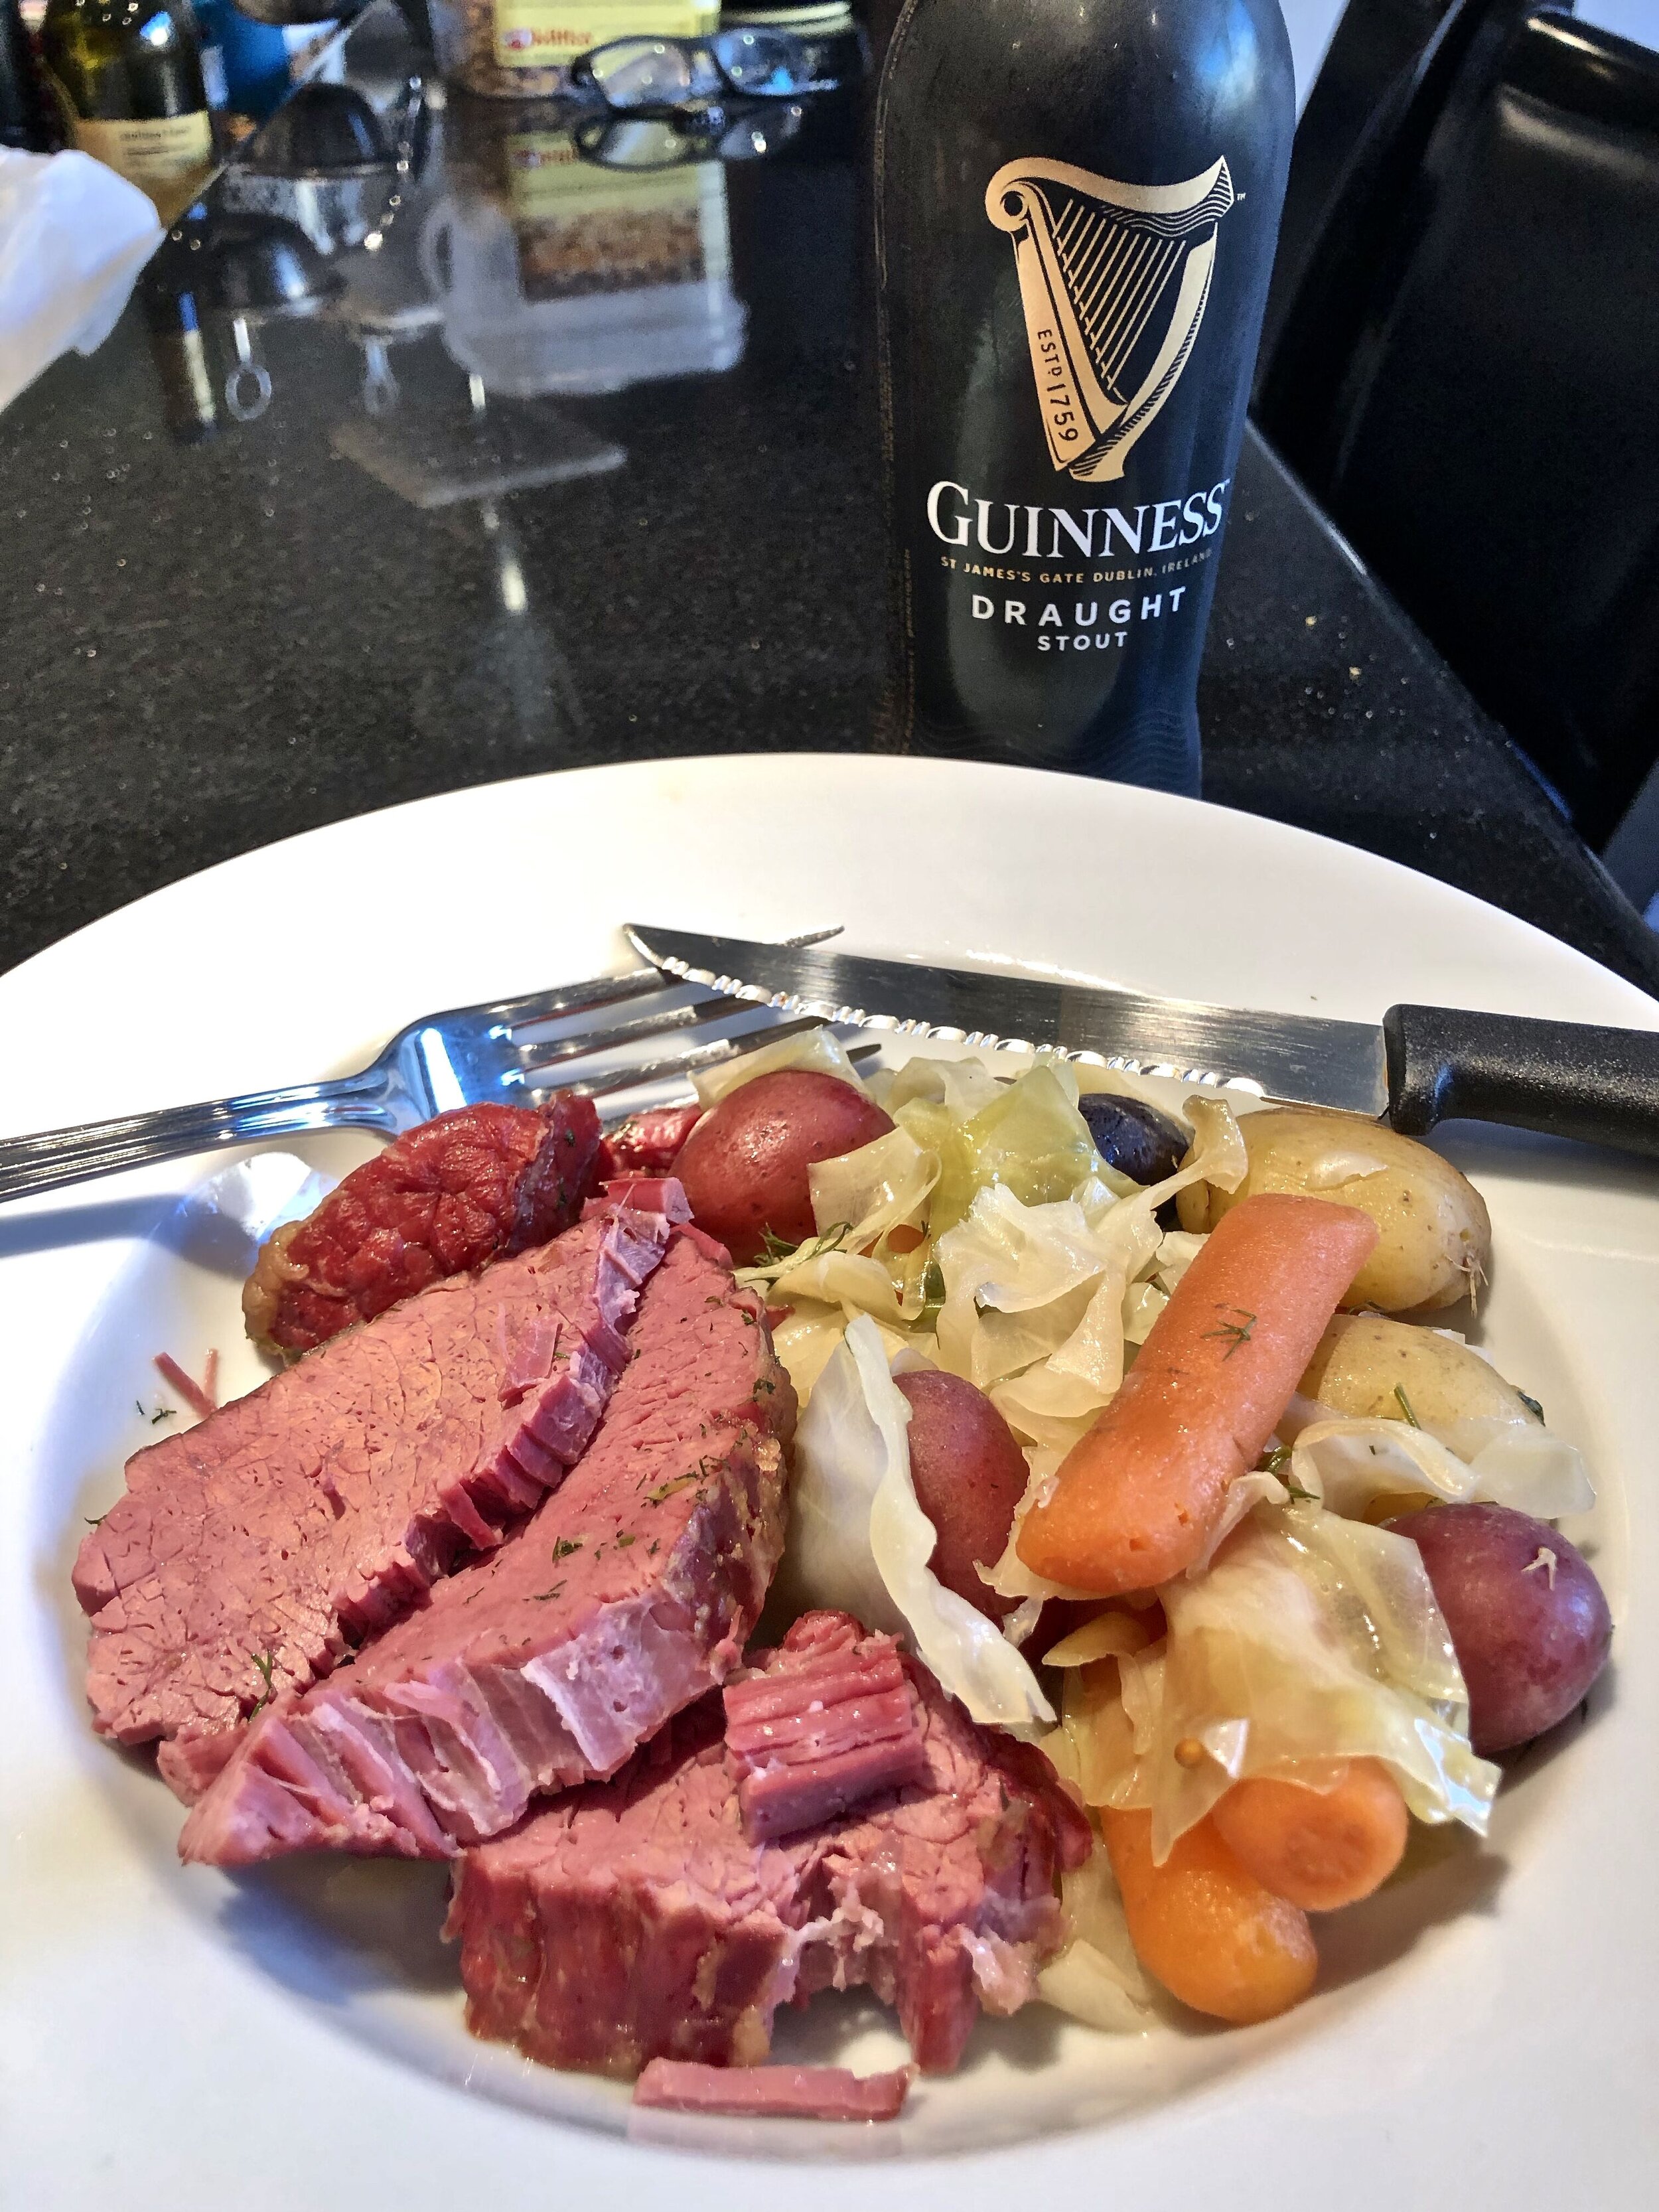
Smoked Corned Beef & Cabbage

This is always one of my faves and I’m not sure why we don’t make it more often than just St. Patty’s Day. Nonetheless, I have had the pleasure of making this for my dear friend and client, Patrick Murphy, on a number of occasions and he loves it! I mean what else would you make for someone named Patrick Murphy! I love to make mine on my Traeger Grille and smoke it first for added flavor.

CornedBeef&Cabbage2.jpeg

INGREDIENTS

• One (3-5 lb) corned beef brisket

• 1 quart of chicken stock

• 1 (12 oz) can of beer or cider if gluten free

•1 stick of butter cut into slices

• 6 whole cloves of peeled garlic

• 2 tbsp fresh chopped dill

• 2 cups of baby carrots or more if you like

• 1 lb of multi-colored fingerling potatoes

• 1 head of cabbage cut into wedges

• 1 onion peeled and cut into wedges

Meat Seasoning

• ½ tsp mustard seeds

• 8 Allspice berries

• 2 crushed bay leaves

• ½ tsp salt

• ½ tsp pepper

• 1 tsp of whole cloves

• 1 tablespoon of whole colored peppercorns.

PREPARATION

•Some like to brine the corned beef ahead of time, but I find a lot of the corned beefs are already pre-brined so you can skip this step.

•Take the corned beef out of the fridge, rinse the brisket and pat dry. Then let it come to room temperature.

•Set the temp on your Traeger to “Smoke” and once your fire is lit and the smoker is smoking you can directly place the brisket on the grill grate and smoke the brisket for 2 hours.

• After two hours, remove the brisket from the smoker and place in a foil roasting pan. Increase the grill temperature to 325º with the lid closed.

• Many briskets come with a seasoning packet which you can now sprinkle over the meat, but if yours does not have a packet combine the ingredients listed above to make your own seasoning.

• Pour chicken stock and dark beer (or Cider of choice if you need to go gluten free) over the brisket and into the pan. Cover and crimp the roasting pan with foil.

CornedBeef&Cabbage1.jpeg

• Cook for another 2-1/2 hours until the corned beef is fork tender.

• Remove the roasting pan from the grille and remove the foil and add the carrots, onions, and potatoes. Cover the meat and vegetables with whole cloves of garlic, salt to taste, and butter slices.

• Recover with the foil crimping well and cook for an additional 20-30 minutes or until the potatoes and carrots are tender. Now add the cabbage wedges and cover, crimp and grill for another 20 minutes.

• Remove from the grill and remove the vegetables from the pan to a serving bowl or platter. Slice the beef and serve with the potatoes, cabbage, onions and carrots and douse with the broth and garnish with fresh dill and thyme.

• Grill some bread to serve on the side and enjoy!

Burrata & Olive Antipasto

We have an assortment of Inspiring, favorite cookbooks here in the studio! Most recently we harkened back to our travels through our beloved Spain and made a wonderful, savory afternoon appetizer to celebrate our Principal, Meredith Thomson’s birthday. This recipe comes from “The Forest Feast Mediterranean”, one of 4 books written by Erin Gleeson. This is Erin’s most recent cookbook and highlights her travels with her family through Italy, Spain, Portugal and France……all Candelaria Design favorite destinations!

IMG_1576.jpg

Erin is a chef, author, artist and photographer. Her books are works of art and the recipes are robust and simple to do with accessible and healthy ingredients. She also writes a wonderful blog that is a real treat to engage in, find it HERE.

For Meredith’s celebration we made the Burrata & Olive Antipasto. This recipe was inspired by Erin’s visits to 2 favorite spots in Barcelona, “Lolita Taperia” and “Tapeo”. Erin suggests serving this on grilled bread but we used some wonderful crackers as we anxiously await the completion of our studio demonstration kitchen which will expand our ability to offer a full culinary experience!…stay tuned for that!

Here is the recipe as it appears in the book:

IMG_1574.jpg

Erin does all her own food styling and photography which makes her books so stunningly beautiful! This recipe was easy, light and fresh and gone in no time, our team loved it!

Erin’s rendition from the book!

Erin’s rendition from the book!

Here is our creation! We urge you to give this a try, and feel quite sure it will become a regular go to! Of course it goes without saying a gorgeous chilled bottle of wine makes it all the better!….now this is Inspiring Living in Candelaria Style!!!

Our Candelaria Burrata & Olive Antipasto

Our Candelaria Burrata & Olive Antipasto

Here’s our talented and beloved birthday girl!

Here’s our talented and beloved birthday girl!


Vanilla Yogurt Parfait infused with fresh lemon

One of our favorite morning offerings in the design studio is this yogurt parfait. It’s super simple with a lovely depth of flavor!

IMG_1545.jpg

This makes a great, light breakfast or quick lunch. Use really flavorful vanilla yogurt, your favorite granola and then the most important embellishment of all…..fresh grated lemon zest! Trust us, this is a winner all around!

IMG_1542.jpg

We are fans of Lucerne-Low fat vanilla yogurt and this really great granola packed with ingredients available at CostCo.! Give it a try and share some Candelaria Culinary Style at your next brunch!

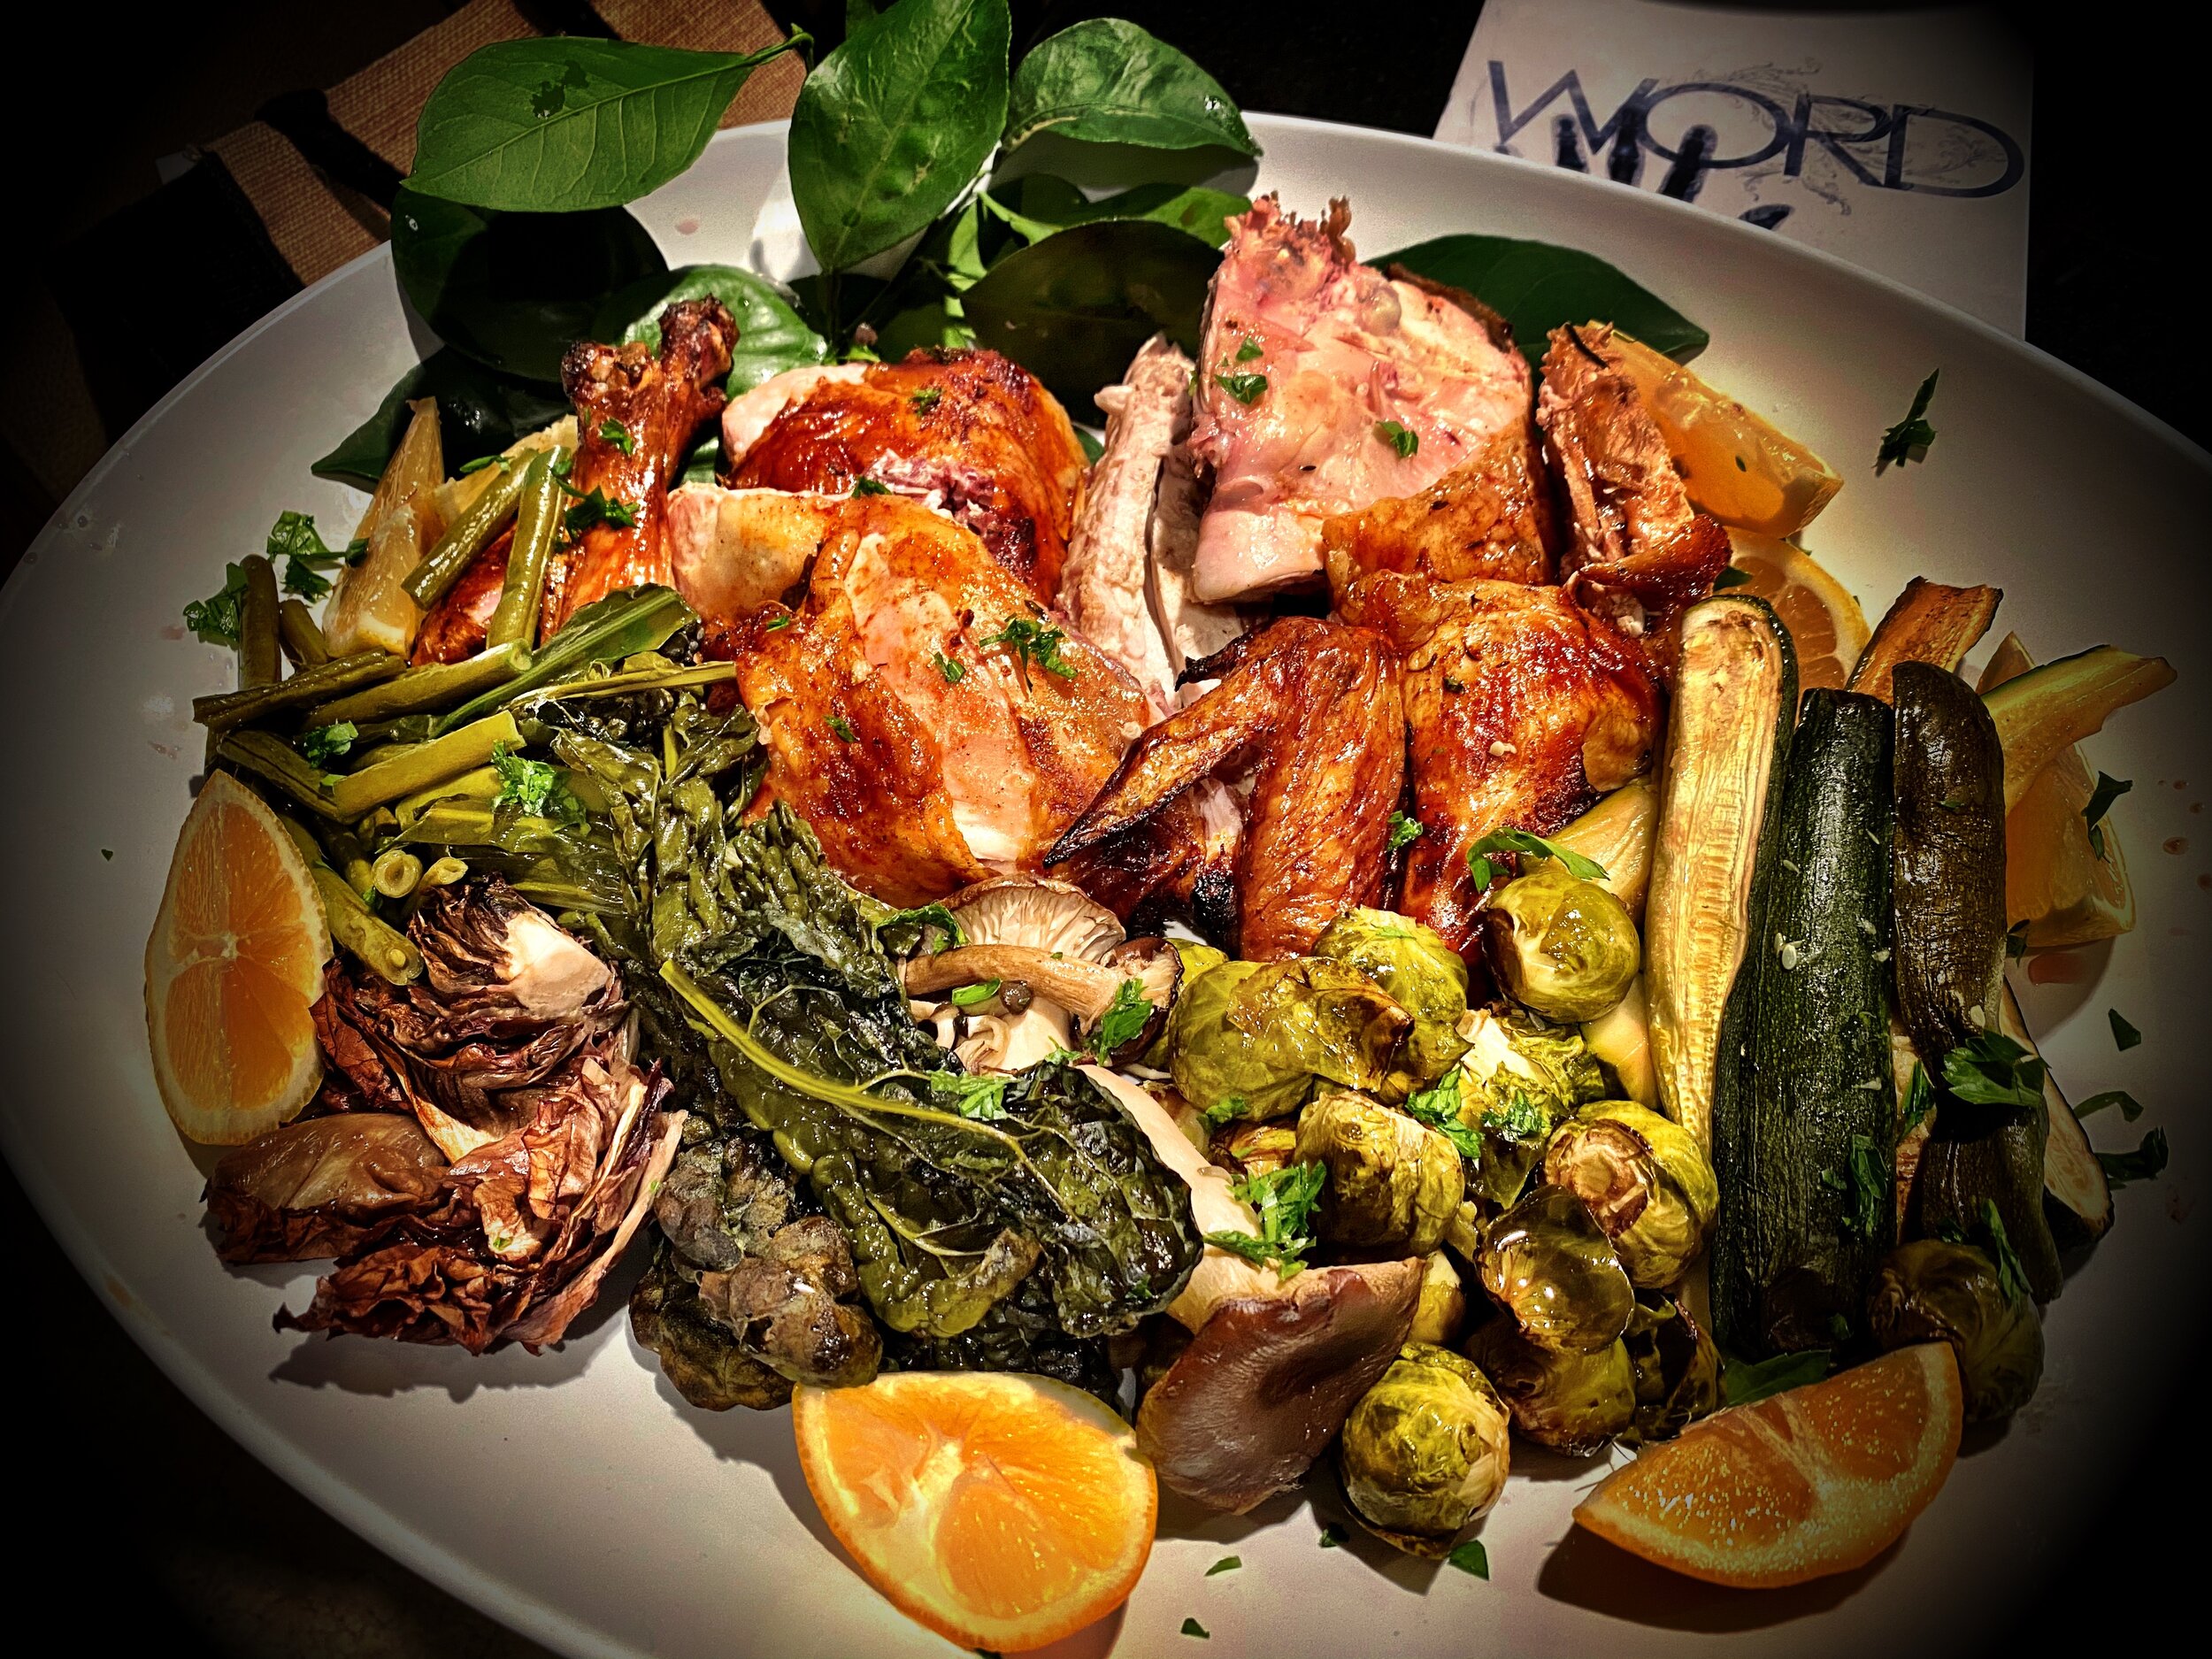
Spatchcock Grilled Jerk Chicken

Here I have a zesty grilled Jerk chicken recipe for you that's easy, filling and makes great leftover options.

Ingredients:

6 Servings per chicken

* 1 medium organic whole chicken

* 2 cloves of garlic finely chopped

* One New Mexico dried red chili, deseeded and de-stemmed and chopped/crushed.

* 2 tbsp of Caribbean jerk seasoning

* Fresh Italian parsley, coarsely chopped as needed.

* ¼ cup of olive oil as needed to cover the chicken

* 1 tsp of salt and 1 tsp pepper

JerkChickenGrill.jpeg

Preparation

* To spatchcock the chicken - wash the chicken and pat dry. Then lay the chicken breast side down on a cutting board. I like to use a set of kitchen shears and cut along both sides of the chicken backbone and remove the backbone. Turn the bird over and flatten the bird out by cracking the breast bone.

* I then sprinkle some olive oil over the chicken and use my hands to rub it all over the chicken - then wash!

*Then squeeze lime juice all over the chicken and then generously sprinkle the jerk seasoning combined with the garlic and red chili all over the chicken, along with salt and pepper.

* Then place the chicken on the grill breast side up (if grilling on a Weber or similar grille, grill the chicken indirectly) and grill the chicken for about 30-45 minutes before flipping to the other side and grill another 30-45 minutes depending on the size of the chicken until the chicken comes up to a temperature of 165º. I love to grill the chicken on my Traeger grill and so I set mine to Smoke until I see the smoke and then I crank my Traeger to 450º.

* After grilling, let the chicken rest by covering with foil for 10-15 minutes. Cut the chicken into the pieces you like and garnish with more freshly squeezed lime juice and sprinkling of parsley. Serve with grilled vegetables, or rice, potatoes, risotto etc. Save the leftovers for topping a salad, tacos, whatever - ENJOY.

JerkChickenFinal.jpeg

Grandma Karin’s Open-Face Red Chile Enchiladas

Mark’s Mom Karin, makes some mean enchiladas. Karin was born in the former East Germany, so she didn’t learn to make Red Chile Enchiladas there! She learned the recipe from her mother-in-law, Rose Candelaria, in Durango, Colorado. This is Mark’s spin on both of their recipes.

Enchiladas.jpg

INGREDIENTS

Red Chile Sauce

• 12 Hatch red chiles with stems and seeds removed but not the veins

• 2 cups water

• 1 1/2 cups of chicken broth

• 2 cloves organic garlic roughly chopped

• 2 peppercorns crushed

• 1/2 tsp of cinnamon

• 1/4 tsp dried oregano; use Mexican dried oregano, if possible

• 1/3 cup dried red Chile powder

• Sea salt to taste

Enchiladas

• 2–4 lbs pork or beef roast – boneless or bone in

• Salt and pepper to taste

• 1 1/2 tsps of oregano

• 6–8” corn tortillas – right out of the bag

• Diced tomatoes

• Diced red onions

• Shredded Mexican cheese or Cheddar

• Sliced radishes

• Shredded iceberg lettuce

• Cilantro and a lime wedge to garnish, and you can always add a dollop of sour cream

IMG_2396.jpg
IMG_2406.jpg

PREPARATION

Red Chile Sauce

• Remove the stems and seeds from the dried chilies. Flatten the chiles as much as possible and place on a metal sheet pan and then lightly smoke and toast them in your smoker, taking care not to let them burn. You just want to warm them up and infuse that smoky flavor.

• Transfer the chiles to a pot, cover with water and bring them to a simmer; continue cooking for about 5 minutes. Set them aside to soak for another 10 minutes; by this time, they should be rehydrated and fleshy. Discard all but a cup of the water.

• Put 1 cup of chicken broth and the one cup of Chile water into the blender, add the garlic, peppercorns, oregano, salt, cinnamon and blend as smooth as possible. I also like to add some dried powdered Chile; use whatever level of heat you want to kick up your sauce.

• Add the chiles and blend them as much as you can so you get a nice thick liquid. Add more dried Chile or more broth to adjust to the desired thickness. You want it to have a nice thickness –– not too runny and not too thick –– like a nice gravy.

• Transfer the sauce to a bowl through a fairly fine strainer, pressing as hard as you can to extract as much of the flesh as possible. Discard the debris of tough skin still remaining. Add more salt and oregano if necessary. Your sauce is ready to go!

Meat Preparation and Enchilada Assembly

• While your sauce is underway, you can prep your meat. I have used everything from a boneless or bone-in pork roast that I cube and brown with a little flour. I have used chicken, crab, cubed fish, lobster, smoked brisket, beef cubes, basically whatever. Many times I will use the leftovers from a plentiful barbecue to make enchiladas the next day.

• Season with garlic, salt, pepper and more oregano.

• With your meat cubed and browned or if leftovers are ready to go, toss them in the prepared red Chile sauce and let everything simmer –– the longer the better so the meat absorbs the moisture of the red Chile sauce.

• To assemble the enchiladas, take one corn tortilla from the bag and quickly toss it in the sauce and pull it out with tongs and lay flat on the plate with which you will serve the enchiladas in. Don’t leave in the sauce for more than a couple of seconds or it will fall apart. You can always do a second as two on a plate look great.

• Spoon some meat and sauce on the dipped tortilla. Top with the cheese, onion, lettuce, radishes and tomato.

• Garnish with the lime, sour cream and diced cilantro.

Enjoy!

Red Chile Smoked Pork Pozole Rojo

Whenever I think of or visit Enchantment Resort, my early project done during the 1980s in Sedona, AZ, I always crave Pozole. Enchantment Resort sits in Boynton Canyon, which is sacred to the Yavapai Tribe, and this dish originated with the native people of Mexico. The word “pozole” means hominy, the main ingredient of this stew. This recipe is a Candelaria-family favorite and was made often by my Grandma Rose in Durango. Enjoy with a shot of tequila and an orange wedge sprinkled with cinnamon sugar.

PozoleRojo.jpg

Red Chile Smoked Pork Pozole Rojo

6–8 Servings

Red Chile Sauce

Follow this recipe or substitute 1–13 oz defrosted tub of Hatch Red Chile, heat level temperature as you like it from mild, medium to hot.

• 12 Hatch red chiles with stems and seeds removed but not the veins

• 2 cups water

• 1 1/2 cups of chicken broth

• 2 cloves organic garlic roughly chopped

• 2 peppercorns crushed

• 1/2 tsp of cinnamon

• 1/4 tsp dried oregano; use Mexican dried oregano, if possible

• 1/3 cup dried red chile powder

• Sea salt to taste

Smoked Pulled Pork Pozole

• 1 5lb bone-in pork butt

• 1-1/2 cups of apple juice

• 4 tbsps brown sugar

• 1 tsp of smoked paprika

• 1 tbsp of salt

• 1 110oz can of Mexican Style hominy, drained and rinsed

• 6 cloves of garlic, diced

• 1 yellow onion, diced

• 1 tsp dried oregano; use Mexican dried oregano, if possible

• 2 bay leaves

• 1 to 2 boxes of 15.5ozs of chicken broth

• salt and pepper to taste


Garnish

• Diced red onions

• Shredded Mexican cheese or Cheddar cheese

• Sliced radishes

• Shredded iceberg lettuce

• Cilantro and a lime wedge

• Optional dollop of Sour Cream

Preparation

Red Chile Sauce

• Remove the stems and seeds from the dried chilies. Flatten the chiles as much as possible and place on a metal sheet pan and then lightly smoke and toast them in your smoker, taking care not to let them burn. You just want to warm them up and infuse that smoky flavor.

• Transfer the chiles to a pot, cover with water and bring them to a simmer; continue cooking for about 5 minutes. Set them aside to soak for another 10 minutes; by this time, they should be rehydrated and fleshy. Discard all but a cup of the water.

• Put 1 cup of chicken broth and the one cup of chile water into the blender, add the garlic, peppercorns, oregano, salt, cinnamon and blend as smooth as possible. I also like to add some dried powdered chile; use whatever level of heat you want to kick up your sauce.

• Add the chiles and blend them as much as you can so you get a nice thick liquid. Add more dried chile or more broth to adjust to the desired thickness. You want it to have a nice thickness –– not too runny and not too thick –– like a nice gravy.

• Transfer the sauce to a bowl through a fairly fine strainer, pressing as hard as you can to extract as much of the flesh as possible. Discard the debris of tough skin still remaining. Add more salt and oregano if necessary. Your sauce is ready to go!

IMG_0924.jpg
IMG_0922.jpg

Smoked Pulled Pork Pozole

• Drain and rinse the hominy and set aside.

• Trim the pork butt of all excess fat leaving the top fat cap intact.

• Combine apple juice, brown sugar, paprika, 2 cloves of garlic smashed and salt in a small bowl and stir until the sugar is dissolved. Using a meat injector, inject the pork butt all over with the mixture. Rub the exterior with olive oil and well coat with your favorite rub.

• Place the pork butt in the smoker and smoke for 1–2 hours.

• Then I like to take the pork butt off the smoker and break it into chunks and put it in the Instant Pot with 1 cup of chicken broth. Close the lid, set to high pressure and cook for 40 minutes. When done, release the lid and remove, reserving the juice.

• Sauté the onions and remaining garlic in a little olive oil in a stock pot until tender and translucent. Shred the pork and pour the juice from the Instant Pot and add the pulled pork into the stock pot with the onions and garlic and then add the drained and rinsed hominy. Add the red chile sauce, and as much broth as you like.

• Add salt, pepper, oregano and two bay leaves and bring to a boil, then simmer as long as you can.

• Serve in a bowl and garnish as you prefer.
Enjoy!